|
PhotoMatix is a program that photographers can use to solve a perplexing problem. The problem is shooting good photos where there is a wide variation in contrast within a scene. For example, in a situation where you want to take a photo of a tall building with the sun high up in the sky in the background and a shadow in the foreground, the problem is that there's no way to set the camera's exposure controls to expose all the regions in the scene properly in a single shot. In a situation like that, if you set your camera's exposure controls to properly expose the building, the background will be washed out, but if you set the camera to expose the background properly, the building will be too dark, as will the foreground.
A photographic technique called High Dynamic Range (HDR) helps solve this problem. The HDR method involves shooting multiple photos of the same scene, each with a different exposure setting. These individual photos each have a Low Dynamic Range (LDR). You then combine the LDR images into a single photo that has a High Dynamic Range. This technique is not new, although the software to combine multiple LDR photos into a single HDR photo is fairly new.
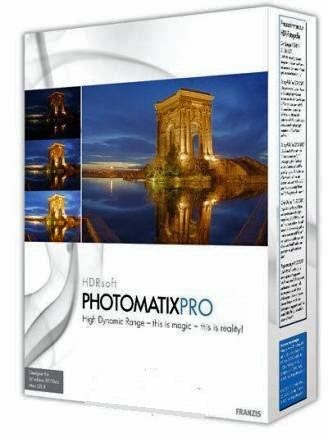
I saw PhotoMatix demonstrated at the February meeting of the South Jersey Photo Club. The HDR technique and the PhotoMatix software intrigued me, so I contacted the publisher to request a free review copy, which they quickly provided in return for my promise to write a review.
Here is the procedure. You begin by shooting the same scene at least three times, each with a different exposure setting. If you shoot more than three photos of a scene, it allows for a higher dynamic range, but three images is enough to get good results if the images are exposed over a wide enough exposure range. You can also cheat by making copies of a RAW image file, then setting each copy to a different exposure setting, but the results won't be as vibrant as actually shooting different photos of the same scene.
An easy way to shoot multiple photos of the same scene with different exposure settings is to use a feature that some cameras have, called automatic exposure bracketing (AEB). A list of some of the cameras that offer this AEB feature is on HDRSoft's web site. If your camera either doesn't have an AEB feature or it cannot set the bracket to two or more full stops, then you can do the bracketing manually by adjusting the shutter speed yourself, while maintaining the same f-stop. Set your camera to bracket at least two shutter speed settings in order to get a wide exposure range. If given a choice, set the AEB feature to shoot at least three shots, although more exposures is better. At least one of those shots will be exposed for the subject, one will be exposed more for the foreground and another will be exposed more for the background.
To make the HDR technique work effectively, you must hold your camera very steady so each shot shows the same scene. A tripod helps achieve the steadiness, although Photomatix does offer a feature to help in situations where a tripod is not used.
Set your camera to aperture priority so the aperture remains the same for each bracketed image. Check your camera's manual if you do know how to do this. Set the aperture for whatever is appropriate for the effect you want to achieve. Keep in mind that the aperture controls depth of field, which is how much of the foreground and background is in focus. For example, if you want a narrow depth of field, set the aperture to a small number. If you want a wide depth of field, set the aperture for a large number.
If your camera has image stabilization, turn it off. Image stabilization can cause the focal point to vary slightly between the differently exposed shots. This is not desirable because it will make it harder to combine the photos. You want every setting on the camera to be fixed, except for the shutter speed. If you mistakenly allow the camera to vary the aperture, you will get a fuzzy HDR image.
Let's look at an example. What you see in figures 1-3 is a set of three bracketed photos. I shot this set during a recent visit to Boston. These photos were all shot in RAW with my 12MP Canon DIGITAL Rebel XSi dSLR. Using RAW instead of JPEG is beneficial here because the PhotoMatix software does a lot of processing of the images, so the more data it has to work with, the more details the resulting HDR photo will contain.
To ensure that each photo was of the exact same scene, I put my camera on a tripod. The scene is a bridge over the Charles River. I was standing on the Cambridge side of the river looking toward Boston. These photos were shot around 8:00 on a Sunday morning, as the sun was low in the sky and glistening off the ice in the river. This scene has a wide range of illumination from the dark regions under the arches of the bridge to the bright sky surrounding the tall building in the background and the bright light reflecting off the ice in the river.
Creating an HDR image from LDR images with PhotoMatix is a two-step process, but getting to the end result is fairly easy. Be aware that this process is processor-intensive. PhotoMatix does not use multiple processors or multiple cores, so throwing a MacPro with quad core processors at it will not yield any faster performance then an Intel-based iMac of the same CPU speed. The more images you work with and the larger they are, the more memory your Mac will need. If you look in the FAQ file on HDRsoft's web site, there's a section that discusses memory requirements. Combining these three 12MP images on my MacBook Pro took about one minute for the first step in PhotoMatix, then another minute to do the second step.
Before I got to the point where I used PhotoMatix, I imported these photos from my camera's memory card to iPhoto '09 on my MacBook Pro laptop. I didn't do any exposure correction on the original three images. I then exported these photos in their original RAW format to a folder. Next, I dragged the three RAW image files onto the PhotoMatix icon. This creates a basic HDR image, which is similar to a film negative. The resulting HDR image looks rather unimpressive because its full range of colors cannot be viewed on a computer's display.
The second step in PhotoMatix is to create a tone-mapped version of the HDR image file. There are various settings you can use in creating the tone-mapped image, some of which result in a more realistic picture and some, which yield a more artistic image. The result I got, by tweaking some of the tone mapping controls, appears in Figure 4. This HDR image looks sort of like a painting. I didn't do any further processing of this image. I could have imported it into iPhoto '09, Photoshop, or another image editor and brightened up the building, but I wanted to demonstrate what PhotoMatix could do on its own for this review
Figure 1 was shot at 1/200th of a second. As a result, it is much too dark, or underexposed. Figure 2 was shot at 1/80th of a second and if I didn't have PhotoMatix, I would be fairly happy with that photo. As you can see in Figure 3, which was shot at 1/40th of a second, the shutter was open for too long a period of time. The result is a greatly overexposed photograph, with much of the photo washed out. None of these three LDR photos is properly exposed across the entire image. The way I fixed that problem was to use PhotoMatix to combine the three LDR image files into the HDR photograph that appears in Figure 4. Even in Figure 4, there are a few areas that are underexposed, such as the regions below the bridge and the brown section of building behind the tower, in the foreground. Fortunately, those flaws in Figure 4 are minor and easily fixed in any photo editor. The flaws in the first two photos are much more difficult to fix in a photo editor because their exposure settings are so far off the mark.
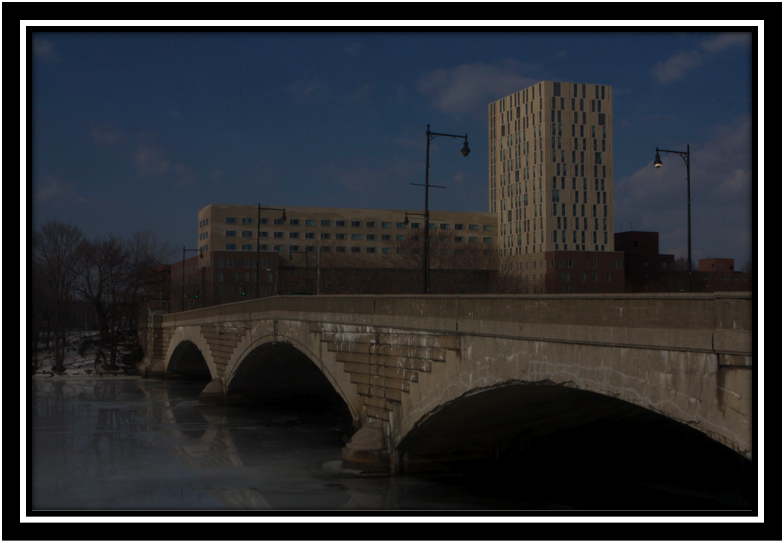
Figure 1 — aperture: f22 — shutter speed: 1/200
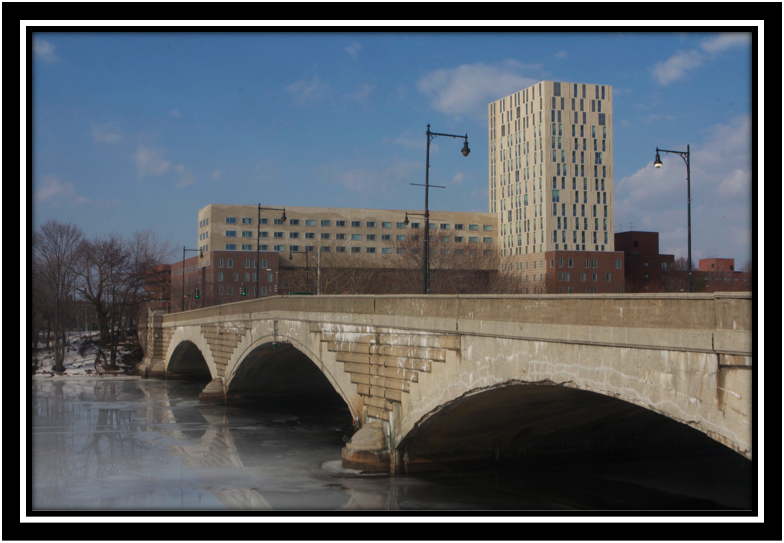
Figure 2 — aperture 22 — shutter: 1/80
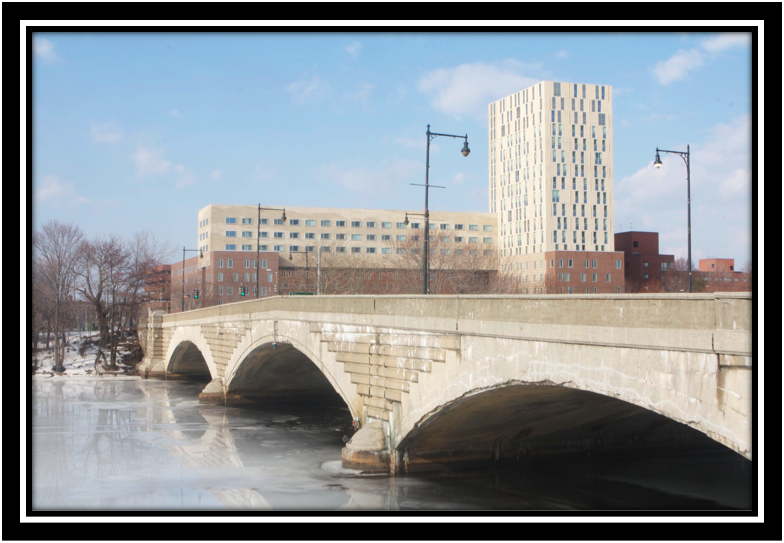
Figure 3 — aperture: f22 — shutter speed 1/40
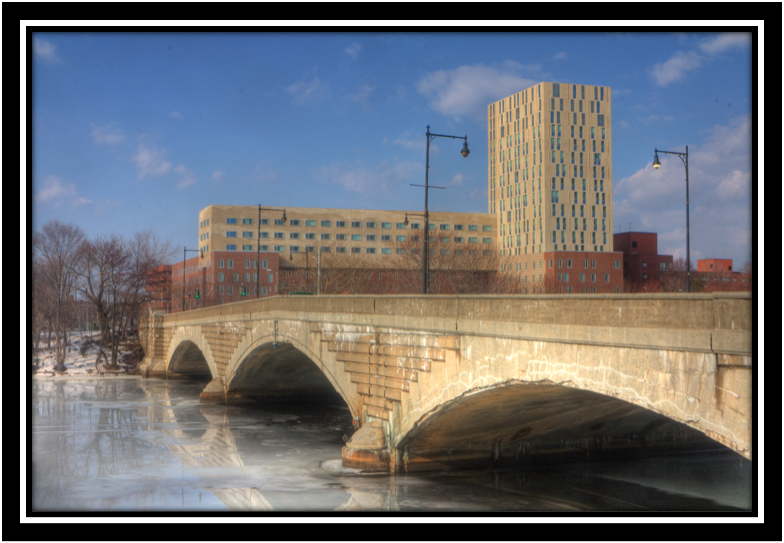
Figure 4 — HDR photo
 |
Reviewer: Stan Horwitz
Stan Horwitz is a long-time Mac user and computer technologist. Stan uses his Macs for everything from personal taxes, banking, and investment management to interactive messaging, digital photography, music, and keeping in touch with distant friends and family.
Stan works for Temple University's Enterprise Systems Group where he is responsible for planning and implementing disaster recovery procedures, electronic mail list management, research computation, and technology planning for the University. |
This site has many more reviews, all written by MLMUG members.
View all our book reviews. Or, view
our
Software, hardware, and game reviews.
[ home
| newsletter | past
| join | listserve
| shareware | directory
| links | md9 ]
© 2009 by
Stan Horwitz & MLMUG
Posted 02/24/09
Updated xx/xx/09
|