"MLMUGers subject their Macs to mysterious code"
[ home | reviews | bylaws | library ]
|
View all our book reviews. Or, view our Software, hardware, and game reviews.
by Mike Berman |
|

|
If you have used earlier versions of Photoshop Elements (PSE), then you should find this latest version relatively easy to manage. My previous experience has run through Photoshop Light Edition (PS LE), then PSE v.1, v.2, and v.4. After I purchased Version 4, I found that it was not native — fully functional under Intel and Leopard, but slow and causing excessive disc churning. Photoshop Elements 6 (PE6) for Mac, built for Intel/Leopard, looks a lot different on the monitor than previous versions. The immediately noticeable changes are:
With "Edit" selected, the following options are available:
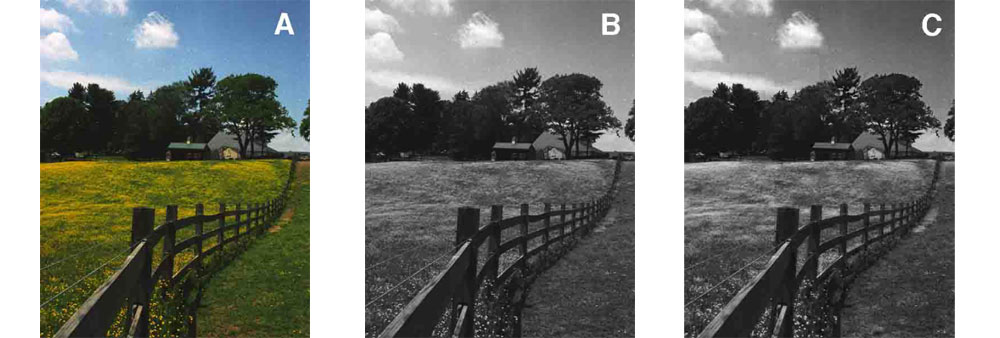
Click the "Projects" submenu under "Create," and make a photo book, a photo collage, a web photo gallery, a PDF slide show, and further options for greeting cards, CD/DVD jackets, and CD/DVD labels. The "Artworks" submenu facilitates adding a variety of backgrounds, frames, graphics, dingbat-style shapes, styled text, and what they call "themes" (which are actually more frames or card borders themed for weddings, baby, holidays, sport nights, travel, etc.). For those who are looking for an easy-to-use editor for family and vacation snapshots, group photos and portraits, PE6 is for you, too! Tools for removing red-eye, or pasting someone who missed the shoot into a group photo (I haven't tried that one yet.), along with all the aforementioned expert and easy operators are available. For me, a particularly interesting and effective feature is a new operation under the Enhance menu called "Convert to Black and White..." It's different from fully de-saturating a color image or using "Remove Color" in the Enhance menu, or changing to "Grayscale" in the Image > Mode operation, in that one can choose — and further adjust — several B&W modes to mimic infrared photography, to bring out better contrasts in landscape images (clouds in blue sky, flowers in green grass, etc.), or to optimize portraits and urban scenes. I found it to be very effective on this image of a field of buttercups in a pasture, under a blue sky with cottony white clouds. "A" is the original color image. "B" has been desaturated with the old Image > Mode > Grayscale command, but the to make image "C", I went back to the original color shot and used Enhance > Convert to Black and White > Vivid Landscapes command. Some changes have also been made in several others of the dozens of possible menu choices. For instance, the sharpening commands are no longer under "Filters," but now reside under the "Enhance" menu. Pixels, formerly limited to viewing at 1600%, can now be enlarged to 3200%. I could go on, but you can download a 30-day trial version from Adobe yourself and find even more goodies to play with. The software is available as a download, or as boxed DVD ROM package with $5.95 added for shipping. I found no info on whether the package includes a printed manual, but one is separately available for $20 + shipping. It comes with Adobe Bridge, allowing you organize, browse, locate, and view your photos.
This site has many more reviews, all written by MLMUG members.
[ home | newsletter | past | join | listserve | shareware | directory | links | md9 ] © 2008 by
Mike Berman & MLMUG |